The Amadeus - PMPRO allotment module is a powerful way to handle room blocks for e.g. travel agent allotments (also referred to as allocation or block). Within each allotment a number of rooms is specified that have to be taken out of the hotel's availability and added to the travel agent's availability. Room reservations from within an allotment are taken out of the allotments availability while standard reservations are taken from the hotel's availability.
Choose Allotments option from the Reservations menu.

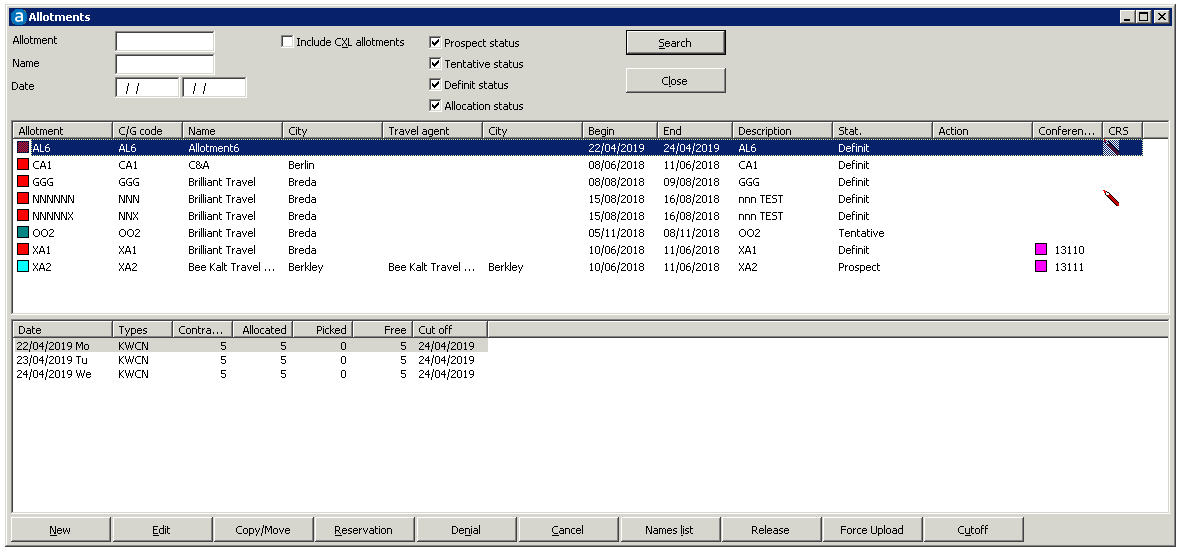
The allotment window consists out of three areas.
The upper area displays a list of all allotments that meet the entered search criteria.
The lower part displays allocation and pickup details of the allotment you have selected in the upper area.
Item |
Description |
Description of the available options |
|
Allotment |
To enter a (part of an) allotment code to search for |
Name |
To enter a (part of an) company name to search for |
Date |
Date range of the allotments to search for |
Include CXL allotments |
To display also allotments with the status CXL |
Prospect status |
To display also allotments with the status PRO |
Tentative status |
To display also allotments with the status TEN |
Definit status |
To display also allotments with the status DEF |
Allocation status |
To display also allotments with the status ALC |
Search |
Enter your search criteria and click [Search] to find all allotment that meet your criteria. Leave all search fields blank to display a list with all allotments that are defined in the system |
Close |
To close this screen |

Item |
Description |
Description of the available options |
|
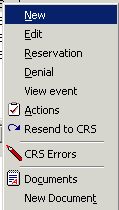
New |
To enter a new allotment. Amadeus - PMPRO uses a wizard to create allotments. Take the next steps to create a new allotment:
|
Edit |
Select an allotment in the upper part of the screen and click [Edit] to make changes to that allotment. The allotment header window will be displayed. |
Reservation |
Select an allotment in the upper part of the screen, then select a date in the lower left area . Then click [Reservation] to pick up a room from that allotment and create a reservation for the selected arrival date. The reservation window will be displayed. |
Denial |
Select an allotment in the upper part of the screen and click [Denial] to enter a denial for that allotment. The denial window will be displayed. |
View event |
To view the attached event |
Actions |
To enter/view/edit/complete actions attached to this allotment |
Resend to CRS |
To resend the allotment to CRS (if an CRS error occurred and the cause was corrected) |
CRS Errors |
To view any CRS error for this allotment |
Documents |
To view documents attached to this allotment |
New document |
To create a new document attached to this allotment |
Available buttons
The following buttons are available in the allotment window:
Item |
Description |
Description of the available options |
|
New |
To enter a new allotment. Amadeus - PMPRO uses a wizard to create allotments. Take the next steps to create a new allotment:
|
Edit |
Select an allotment in the upper part of the screen and click [Edit] to make changes to that allotment. The allotment header window will be displayed. |
Copy/Move |
To copy or to move an allotment to
another date |
Reservation |
Select an allotment in the upper part of the screen, then select a date in the lower left area . Then click [Reservation] to pick up a room from that allotment and create a reservation for the selected arrival date. The reservation window will be displayed. |
Denial |
Select an allotment in the upper part of the screen and click [Denial] to enter a denial for that allotment. The denial window will be displayed. |
Cancel |
To cancel an allotment |
Names list |
To open the names list screen to
add reservations |
Release |
To immediately release rooms from
the allotment |
Force upload |
Force an upload to overwrite existing values in CRS |
Cutoff |
To change the cutoff date of the
selected allotment |