Reports can be created with Brilliants own powerful reports generator. Of course Amadeus - PMPRO is shipped with a large set of reports. Reports are divided into report groups. There are three different types of reports:
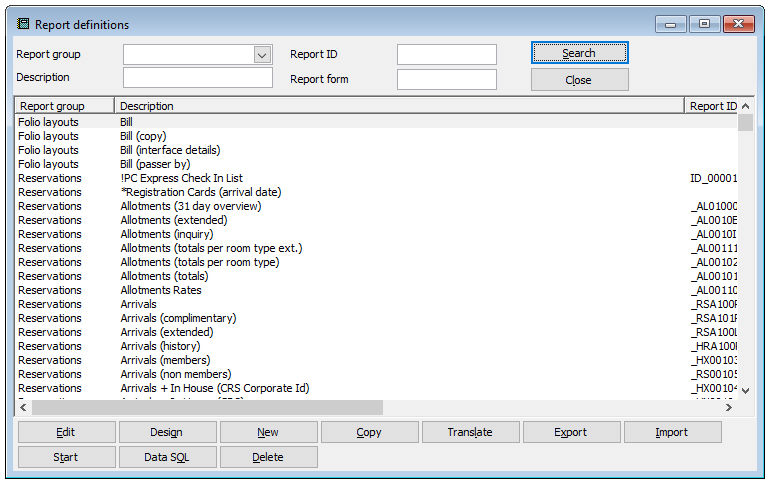
Choose Define reports from the Setup » Reports menu. Then choose a report group and click [OK].
Item |
Description |
Description of the available options |
|
Edit |
Choose [Edit] to change the report menu entry, add the report to a batch and the report dialog which might be displayed when you run the report. |
Design |
Choose this button to modify the report lay out in the PMPRO report designer |
New |
Click this button to add a new record. It is recommended to copy an existing report and change the copy, not to create a new report completely from scratch. |
Copy |
Click this button to copy the selected record. |
Translate |
Choose this button to enter additional translation on reports. The system will ask you for a language: EN for English,NL for Dutch, DE for German, FR for French |
Export |
Choose [Export] to export the selected report.
|
Import |
Choose [Import] to import a report in the Amadeus - PMPRO system.
|
Start |
Click this button to start and view a report. |
Data SQL |
Choose [SQL] to define the report SQL which determines which data should be collected from the Amadeus - PMPRO databases to print on the report. |
Delete |
Click this button to delete the selected record. |
Item |
Description |
||||||||||||||||
Description of general available fields |
|||||||||||||||||
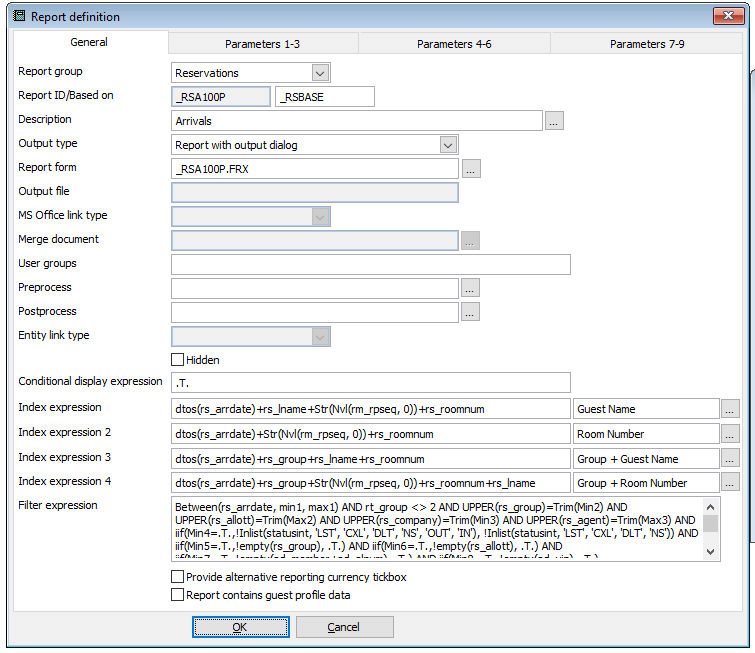
Report Group |
Indicates in which Report Group (e.g. contacts, reservations...) the report can be found. |
||||||||||||||||
Report ID/ Based on |
Displays the report ID. Reports ID's starting with an under score (_) are system reports which cannot be modified. Other ID's or reports without an ID represents custom specific reports, which may be modified. Based on indicates on which other report (or ID) the report lay-out is based.
|
||||||||||||||||
Description |
A description of up to 50 characters.
The description is used in the report menu and is printed on reports.
Enter the description field and click onto the three dots icon
|
||||||||||||||||
Output Type |
Specifies the output of the report. Choose between:
|
||||||||||||||||
Report form |
Specifies the report lay-out file. The file name may contain up to 8 characters and must have the extension .FRX , e.g. myreport.frx . This field cannot be used if the output option is set to DBF or CSV. |
||||||||||||||||
Output file |
To specify the name of the FoxPro database file to which you would like to export the data. The file name may contain up to 8 characters and must have the extension .DBF, e.g. nwexport.dbf. The file will be saved in the \PMS\dde directory. This field can only be used if the output option was set to DBF.
|
||||||||||||||||
MS Office link type |
The MS Office link type is used to automatically start MS Word or MS Excel to merge data that were exported to a DBF or CSV file in to a MS word template or an MS Excel spread sheet. This option is only available if the output option was set to DBF or CSV. Choose None if you only would like to create an export file without merging the data in a Word or Excel document.
|
||||||||||||||||
Merge document |
Select the word or excel template to be used for the export of these data from the \PMS\DOT folder |
||||||||||||||||
User groups |
To specify the user groups that are allowed to print the report. You may enter multiple user groups, separated by a comma, e.g. MANAGER,EVERYONE. All user groups are allowed to print the report if this field is left blank. |
||||||||||||||||
Preprocess |
Preprocess to be executed before starting the report. This is often used to speed up the data gathering. |
||||||||||||||||
Postprocess |
Postprocess to be executed after the report is finished. |
||||||||||||||||
Entity link type |
Defines which entity this document is linked to: contact or reservation or allotment or leisure |
||||||||||||||||
Hidden |
If activated this report is hidden in the reports menu for everyone. | ||||||||||||||||
Conditional display expression |
If this condition is true, the report is shown in the menu. Used for reports especially for certain modules or interfaces. | ||||||||||||||||
Index Expression |
It is possible to display reports in different sort orders, in these fields these sort orders are defined and named. |
||||||||||||||||
Filter expression |
Here additional filters can be added. For example to call a certain report with additional conditions to the used SQL query. |
||||||||||||||||
Provide alternative reporting currency |
If the report is to display an alternative currency. In Setup, Preferences, Financial tab the field 'Alternative reporting currency' must be selected. |
||||||||||||||||
Report contains guest profile data |
For the GDPR requirements |
||||||||||||||||
OK |
Saves and closes the screen |
||||||||||||||||
Cancel |
Closes the screen without saving |
||||||||||||||||
Description of parameter fields |
|||||||||||||||||
Prompt 1...9 |
|
||||||||||||||||
Operator 1...9 |
Choose between:
|
||||||||||||||||
Data type 1...9 |
Choose between:
|
||||||||||||||||
Input Mask 1...9 |
Here the minimum of characters can be defined by entering exclamation marks: !!! indicates a minimum of 3 characters. @*C indicates a statement: false or true (.F. or .T. in minimum default expression)
|
||||||||||||||||
Minimum default expression 1...9 |
Used to specify a default or minimum default that must be used in the dialog (depending on operator: Equal or Range). The default will also be used by reports printed from a batch. Examples:
|
||||||||||||||||
Maximum default expression 1...9 |
Used to specify a maximum default that must be used in the dialog. The default will also be used by reports printed from a batch. Examples:
|
||||||||||||||||
 The
exported files can be saved to any location on your computer,
the network or a USB disk and can be used to import the report
again in another Amadeus - PMPRO version.
The
exported files can be saved to any location on your computer,
the network or a USB disk and can be used to import the report
again in another Amadeus - PMPRO version. to enter the description in multiple languages.
 to enter the description in multiple languages.